When you deploy an AI gateway that sits between users, channels, and model providers, especially one that can broker tool calls, you're not just running "another app." You're creating a trust boundary. This guide walks you through a security-first, repeatable Docker setup on a VPS and explains the reasoning behind each control.
About OpenClaw: OpenClaw is an open-source personal AI assistant that you run on your own infrastructure. Learn more at openclaw.ai · GitHub · Docker Setup Docs
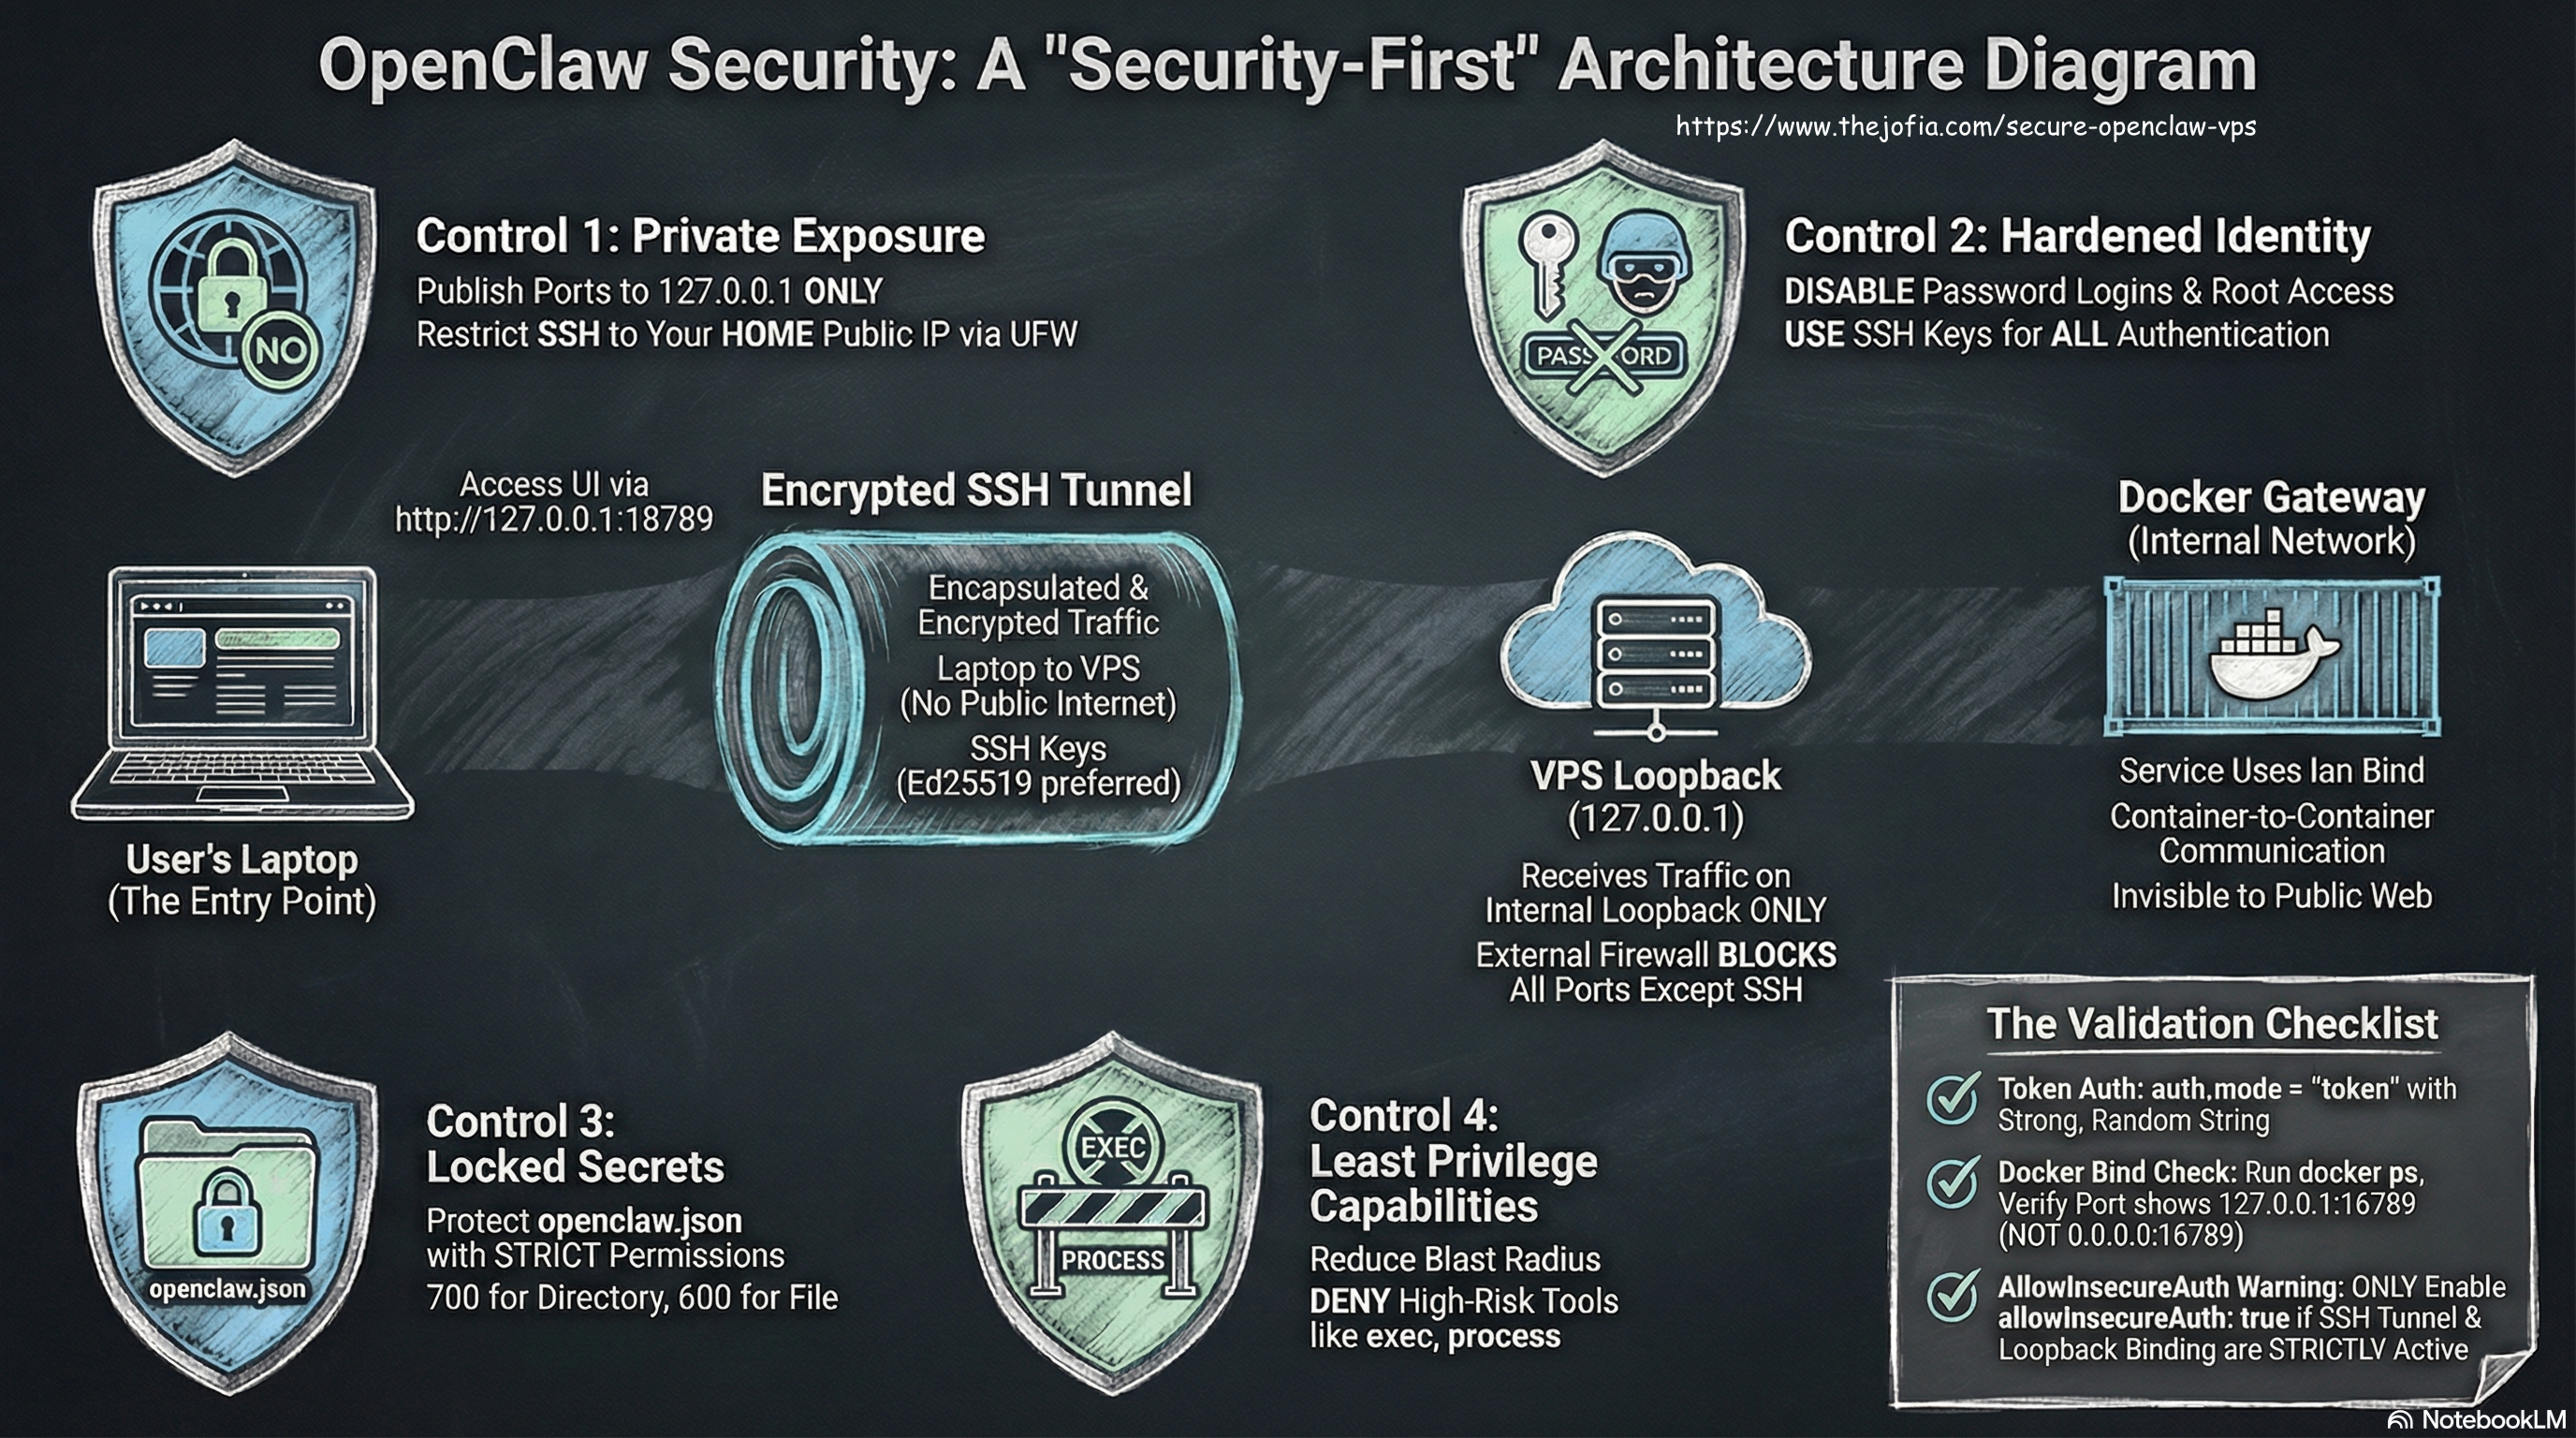
Why Security Matters for AI Gateways
AI gateways like OpenClaw occupy a uniquely sensitive position in your infrastructure. They handle authentication tokens for model providers, route potentially sensitive prompts, and can execute tool calls that interact with external systems. A compromised AI gateway doesn't just leak data; it can act on your behalf.
If you strip the buzzwords, you're protecting four things:
- Exposure: Who can reach the gateway and UI (network surface area)
- Identity: Who can authenticate (SSH + gateway auth)
- Secrets: Where tokens live and who can read them
- Capabilities: What the system is allowed to do (tool blast radius)
This guide keeps those four controls explicit and easy to verify at every step.
The Security Posture at a Glance
Control 1 - Exposure (Default: Private)
Goal: Prevent accidental internet access.
- Publish OpenClaw ports to VPS loopback (
127.0.0.1) only - Access from your laptop via SSH tunnel
- Firewall exposes only SSH (ideally restricted to your home IP)
Control 2 - Identity (Default: Keys Only)
Goal: Remove the easiest attack path on servers.
- SSH keys only - no password login
- No direct root login
Control 3 - Secrets (Default: Least Readable)
Goal: Prevent token leakage through filesystem permissions.
~/.openclawdirectory:700(owner read/write/execute only)openclaw.json:600(owner read/write only)
Control 4 - Capabilities (Default: Least Privilege)
Goal: Reduce impact if a channel or token is compromised.
- Deny risky tools such as
execandprocessunless you explicitly need them
Architecture Overview
Before diving into the steps, understand the traffic flow:
└─▸ http://127.0.0.1:18789 (local)
└─▸ SSH tunnel (encrypted)
└─▸ VPS 127.0.0.1:18789 (loopback-only)
└─▸ Docker gateway (bind: lan inside Docker network)
Two details matter here:
- Inside Docker:
bind: lanallows container-to-container access (the CLI container is not on "localhost" from the gateway's perspective) - On the VPS: Port publishing to
127.0.0.1prevents any internet access to the service
Prerequisites
- A Linux VPS (Ubuntu 22.04+ assumed below; this guide was tested on Hetzner, though the steps apply to any provider)
- SSH access with keys (Ed25519 preferred for modern security)
- Docker + Docker Compose v2 (
docker compose, not the legacydocker-compose)
Step 1 - Harden SSH (Keys Only, No Root Login)
SSH is the front door to your VPS. The default configuration on most providers allows password login and root access, both easy targets for brute-force attacks. Let's close those paths.
Create a non-root user and grant sudo:
adduser appuser
usermod -aG sudo appuser
Move SSH access to the new user:
mkdir -p /home/appuser/.ssh
chmod 700 /home/appuser/.ssh
cp /root/.ssh/authorized_keys /home/appuser/.ssh/authorized_keys
chmod 600 /home/appuser/.ssh/authorized_keys
chown -R appuser:appuser /home/appuser/.ssh
Lock down SSH configuration in /etc/ssh/sshd_config:
PermitRootLogin no
PasswordAuthentication no
PubkeyAuthentication yes
Restart SSH to apply:
sudo systemctl restart sshWhat this achieves: Even if someone discovers your VPS IP, password brute-force becomes irrelevant and root is not directly reachable. The attacker would need your private key to get in.
Step 2 - Firewall with Intent
A firewall is your second line of defense. UFW (Uncomplicated Firewall) on Ubuntu makes this straightforward:
sudo ufw allow 22/tcp
sudo ufw enable
sudo ufw status
For a stronger stance, restrict SSH to your home public IP only:
sudo ufw delete allow 22/tcp
sudo ufw allow from YOUR_HOME_PUBLIC_IP to any port 22 proto tcp
sudo ufw status
What this achieves: SSH stays reachable for you, but random internet traffic can't even attempt a connection. Combined with key-only auth, you've eliminated the two most common VPS attack vectors.
Defense-in-Depth: Use Your Provider's Firewall Too
UFW is your host-level firewall. But most cloud providers (including Hetzner) offer a network-level firewall at the edge. Enable that as well:
- Why this matters: If your host firewall configuration drifts (through a package update or accidental flush), the provider firewall still blocks unwanted traffic.
- What to configure: Allow SSH (port 22) from your home IP (or
/32CIDR for a single IP). Deny everything else by default.
Best practice: Keep the provider firewall rules identical to UFW. This creates a layered defense: if one layer fails, the other still protects you.
Two Safe SSH Access Patterns (and How to Avoid Lockouts)
Restricting SSH to a single home IP is simple and effective, but there's a catch: if your home IP changes, you're locked out. Here are two proven patterns:
Pattern A: SSH Restricted to Home IP
- Setup:
sudo ufw allow from YOUR_HOME_IP/32 to any port 22 proto tcp - Pros: Simple, zero additional software
- Cons: If your home IP changes (ISP rotation, travel, coffee shop), you're locked out
Pattern B: SSH Only via Tailscale (Recommended)
- Setup: Install Tailscale on both your laptop and the VPS, then restrict SSH using firewall rules on the
tailscale0interface - Pros: Works from anywhere (even behind NAT), encrypted mesh network, no lockout risk
- Cons: Requires Tailscale setup (5 minutes)
No-Lockout Rollout Sequence (Pattern B):
- Install Tailscale on VPS and laptop:
curl -fsSL https://tailscale.com/install.sh | sh - Authenticate both devices to your Tailnet
- Verify SSH over Tailscale works:
ssh appuser@100.x.y.z(use Tailscale IP) - Keep (or add) a temporary break-glass home-IP rule:
sudo ufw allow from YOUR_HOME_IP/32 to any port 22 proto tcp - Allow SSH on Tailscale interface:
sudo ufw allow in on tailscale0 to any port 22 proto tcp - Confirm SSH is still listening normally (do not force Tailscale-only
ListenAddress):sudo ss -tlnp | grep ':22' - Test connection over Tailscale again
- After a few successful days on Tailscale, optionally remove the home-IP break-glass rule:
sudo ufw delete allow from YOUR_HOME_IP/32 to any port 22 proto tcp
Safety tip: Keep SSH listening on the VPS public interface, and enforce restrictions in firewall rules. If you force SSH to listen only on Tailscale, home-IP fallback cannot help during outages.
Step 3 - Install Docker + Compose v2
Docker provides a repeatable runtime. You can stop, update, and restart without reinstalling dependencies on the host. Compose v2 is the modern standard (the docker compose subcommand, not the legacy Python-based docker-compose).
sudo apt-get update
sudo apt-get install -y docker.io docker-compose-plugin git jq fail2ban
sudo systemctl enable --now docker
sudo usermod -aG docker $USER
newgrp docker
Verify the installation:
docker --version
docker compose version
Step 4 - Add Intrusion Prevention with Fail2ban
Fail2ban monitors SSH login attempts and automatically bans IPs after repeated failures. It's a simple, effective layer against brute-force attacks.
Enable and start Fail2ban:
sudo systemctl enable fail2ban
sudo systemctl start fail2ban
Verify it's protecting SSH:
sudo fail2ban-client status sshdYou should see output like:
Status for the jail: sshd
|- Filter
|  |- Currently failed: 0
|  |- Total failed:     0
|  `- File list:        /var/log/auth.log
`- Actions
   |- Currently banned: 0
   |- Total banned:     0
   `- Banned IP list:
What this achieves: Even with key-only auth, attackers will still try password guessing. Fail2ban detects these attempts and blocks the source IP for a configurable period. A common baseline is bantime=600 and maxretry=5, but always verify your local settings.
Optional: Whitelist Tailscale IPs
If you later adopt Tailscale (Pattern B above), you may want to prevent Fail2ban from accidentally banning your Tailnet IPs. Create /etc/fail2ban/jail.local:
[DEFAULT]
ignoreip = 127.0.0.1/8 ::1 <YOUR_TAILSCALE_IP_RANGE>

[sshd]
enabled = true
port = ssh
logpath = /var/log/auth.log
maxretry = 5
bantime = 600
Replace <YOUR_TAILSCALE_IP_RANGE> with your Tailscale network range (typically 100.64.0.0/10 for the full CGNAT range, or a more specific subnet like 100.x.y.0/24 for your tailnet). Restart Fail2ban to apply:
sudo systemctl restart fail2banStep 5 - Deploy OpenClaw with Docker
cd ~
git clone <OPENCLAW_REPO_URL> openclaw
cd openclaw
If the repo has a setup helper:
./docker-setup.shStart the service:
docker compose up -d
docker compose ps
Step 6 - Publish Ports to Localhost Only (Your Biggest Safety Win)
This is arguably the single most important security measure in the entire guide. By default, Docker publishes ports to 0.0.0.0, making services internet-accessible. We bind exclusively to the loopback interface instead.
In your docker-compose.yml for the gateway service:
ports:
  - "127.0.0.1:18789:18789"
  - "127.0.0.1:18790:18790"
Apply the change:
docker compose up -dVerify the gateway is not public:
docker ps --format 'table {{.Names}}\t{{.Ports}}' | grep -i gateway✅ You want to see 127.0.0.1:18789->...
🚫 If you see 0.0.0.0:18789->..., the service is internet-facing. Fix it immediately.
Why this matters: You can keep UFW simple because OpenClaw never binds to a public interface on the VPS. Even if UFW is misconfigured, the Docker binding itself prevents external access.
Step 7 - Configure Token Auth and Reduce Tool Blast Radius
Now let's configure OpenClaw itself. First, generate a strong token securely:
# Generate a strong random token
openssl rand -base64 32
Copy the output and store it safely. Then create the configuration file interactively to avoid exposing the token in shell history:
# Create the config directory
docker compose exec -T openclaw-gateway sh -lc 'mkdir -p /home/node/.openclaw'

# Open a shell in the container
docker compose exec openclaw-gateway sh

# Inside the container, create the config file
cat > /home/node/.openclaw/openclaw.json <<'EOF'
{
  "gateway": {
    "mode": "local",
    "bind": "lan",
    "port": 18789,
    "controlUi": {
      "enabled": true,
      "allowInsecureAuth": true
    },
    "auth": {
      "mode": "token",
      "token": "PASTE_YOUR_TOKEN_HERE"
    },
    "remote": {
      "url": "ws://openclaw-gateway:18789",
      "token": "PASTE_YOUR_TOKEN_HERE"
    }
  },
  "tools": {
    "deny": [
      "exec",
      "process",
      "gateway",
      "nodes",
      "canvas",
      "sessions_spawn",
      "sessions_send",
      "sessions_history",
      "sessions_list",
      "agents_list"
    ]
  }
}
EOF

# Exit the container shell
exit
Security Note: Replace PASTE_YOUR_TOKEN_HERE with your actual token by editing the file with a text editor like vi or nano inside the container. This prevents the token from appearing in shell history or process lists.
Safer pattern: Keep token creation and file editing interactive so the secret does not appear in shell history, process arguments, or console logs. Avoid commands that echo tokens back to screen.
Tighten file permissions inside the container:
docker compose exec -T openclaw-gateway sh -lc '
chmod 700 /home/node/.openclaw
chmod 600 /home/node/.openclaw/openclaw.json
'
Restart to pick up the config:
docker compose restart openclaw-gatewayWhat Each Configuration Section Does
auth.mode: token- The gateway requires a token for access; treat it like a password.bind: lan- Allows other containers on the Docker network to connect (the CLI container is not "localhost" from the gateway's perspective).tools.deny- Removes high-risk capabilities by default. Theexecandprocesstools could allow arbitrary command execution if a channel token is compromised. Deny them unless you explicitly need them.- File permissions (700/600) - Reduces the chance of accidental secret exposure to other users or processes on the system.
A Note on allowInsecureAuth
In a strict security posture, you'd prefer false. If your browser session disconnects with false, it's acceptable to keep it true only with all four compensating controls in place:
- Ports are localhost-only on the VPS
- You access through an SSH tunnel
- Token auth is enabled with a strong token
- SSH is hardened and the firewall is minimal
Without these compensating controls, allowInsecureAuth: true would be a real risk.
Optional: Trusted Proxies (Only if Behind a Reverse Proxy)
If you terminate traffic through a reverse proxy (or see warnings about proxy headers), restrict trust to the proxy subnet. First, discover your OpenClaw Docker network subnet:
docker network inspect openclaw_default \
  -f '{{range .IPAM.Config}}{{.Subnet}}{{end}}'
Then add to your config:
"trustedProxies": ["<docker-subnet-or-proxy-cidr>"]Rule: Keep the trusted proxy range narrow. Avoid broad ranges and never use 0.0.0.0/0, which would trust the entire internet.
Step 8 - Access the Control UI Privately via SSH Tunnel
With everything bound to loopback, you access the UI through an encrypted SSH tunnel from your laptop:
ssh -i ~/.ssh/your_vps_key \
    -o IdentitiesOnly=yes \
    -N \
    -L 18789:127.0.0.1:18789 \
    -L 18790:127.0.0.1:18790 \
    appuser@YOUR_VPS_IP
Then open in your browser:
http://127.0.0.1:18789(primary gateway UI)http://127.0.0.1:18790(secondary port, if needed)
Why this is safe: Your browser talks to your own localhost. SSH carries the traffic securely (encrypted) to the VPS loopback port. No credentials travel over the open internet.
Day-2 Operations: Commands You'll Actually Use
Once the setup is running, these are the commands you'll reach for daily:
Check status:
docker compose psView logs (follow mode):
docker compose logs -f --tail=200 openclaw-gatewayRestart gateway:
docker compose restart openclaw-gatewayStop and start everything:
docker compose down
docker compose up -d
Quick Validation Checklist
Before you call the setup "done," walk through this checklist:
Network Exposure
- Gateway ports publish to
127.0.0.1, not0.0.0.0 - UFW exposes only SSH (preferably restricted to your IP or Tailscale)
- Provider firewall (Hetzner, etc.) mirrors your UFW rules for defense-in-depth
Identity and Secrets
- SSH keys only (no password auth, no root login)
- Fail2ban is running and monitoring SSH:
sudo fail2ban-client status sshd - Token auth enabled with a strong, randomly generated token
openclaw.jsonis readable only by the owner (600)
Least Privilege
- Risky tools denied (
exec,process) unless explicitly needed
How to Start Small
If you're new to deploying AI gateways, resist the temptation to configure everything at once. Here's a safe progression:
- Start with private UI only - localhost ports + SSH tunnel. This gives you a functional setup with minimal attack surface.
- Add one channel, test, then add the next - incremental rollout catches configuration errors early.
- Keep the deny-list conservative - only open tool capabilities when you genuinely need them, not "just in case."
- Only add public exposure after TLS - if you ever need internet-facing access, introduce a proper reverse proxy with TLS termination first.
That sequence keeps experimentation safe and cleanup easy. Security isn't a one-time checklist; it's a posture you maintain as your deployment evolves.
Additional Resources
For more information on OpenClaw deployment and configuration:
- Docker Installation: OpenClaw Docker Setup Documentation
- Source Code: OpenClaw on GitHub
- Project Website: openclaw.ai


